Monday, March 26, 2018

New Blog

I can't believe it has been almost a year since I have posted here at JandA&Co.  This place has been my home for many years, and I have shared so much of my life, and so many of my thoughts here.  

I have thought about this little corner of my heart almost every day this year, and God has been tugging on my heart strings to get back here.

It's with that tugging that I'm here to share the announcement that I am starting a new blog.  A sort of collaboration between JandA&Co. and what I has been going on with my Instagram feed called Valley View Abode.  It was time for the two of them to come together, because it's what I love most; sharing my home with my family.


Valley View Abode is what we have named our new recently built home, so I will be sharing some fun insights about that over on the the new blog.

However, I will continue on in JandA&Co. spirit and share all the other things I used to share here as well.  My thoughts on Motherhood, cooking, keeping a home, trying to keep up with life, and any other fun activity we are trying to squeeze in to our household.  All those family things we love to do.

So as you can see it is a simple marriage of Home and Family.

I do believe in keeping records of our greatest memories.  I am grateful to share some of that with you here.  I know that has been a gift over the last 10 years, and I have met many wonderful friends along the way.  

Please come follow along at Valley View Abode, because if you don't; I will miss you.

Also, please be patient as we work out all the kinks with the new website.  Just a few little things just have to settle in, but that will better as I get more and more posts up.  

Please note that at the bottom of my site, you can follow along with what I am doing on Instagram, and please feel free to become a follower on Instagram @valleyviewabode 

I look forward to seeing you over at the new Valley View Abode, sister website to JandA&Co.

Thank you so much for all your years of following me here,

Andrea

Friday, April 7, 2017

Don’t stand back and watch, get creative and dive in.

This year for Spring Break, we took the kids to Southern Utah for a few days.  Then we have spent the rest of the time at home having an awesome STAYCATION!!!

I love Staycations.  I NEED more time with my kids just being at home.  I LOVE having all our activities and sports canceled for the week, and having time to just chill; and cross some things off our list.

Plus, I don’t love our kids thinking that we always have to big or go home!! It’s ok to just be together @ home. …or go small and travel via car to places closer to where we live.  I grew up that way, and I had a great childhood.

 photo Egg Decorating APril 2017-1091_zpstjhymwhl.jpg

This was the perfect week for us to dye Easter Eggs.  Since the kids are older now, it was finally time to break out the magazines and try some of the fun stuff we have seen other people try.  I thought it would be fun to show you what we did. I thought it would spark some ideas for you for this upcoming Easter Holiday.

I was ready to dive in and get creative too.

I thought I would give each project we tackled a level of difficulty.

Then you could assess if you want to attempt it with your age of children and decide if it would work with your family.

You don’t have to do all of these that we did.  You could just choose one to try if your looking for something fun and new.

Level 1 being Easy- 5 being Advanced. 

1) means it’s something that a 5 year old could manage

2) something that my 7 year old can do on her own

3) something that my 7 year old can do but might need help with in some areas

4) something that my 9 year old can manage on his own

5) something that my 12 year old can do, but she is super capable

(these all really need ADULT supervision)

OK.  Lets dye eggs

 photo Egg Decorating APril 2017-1028_zpsw3nyhtkt.jpg

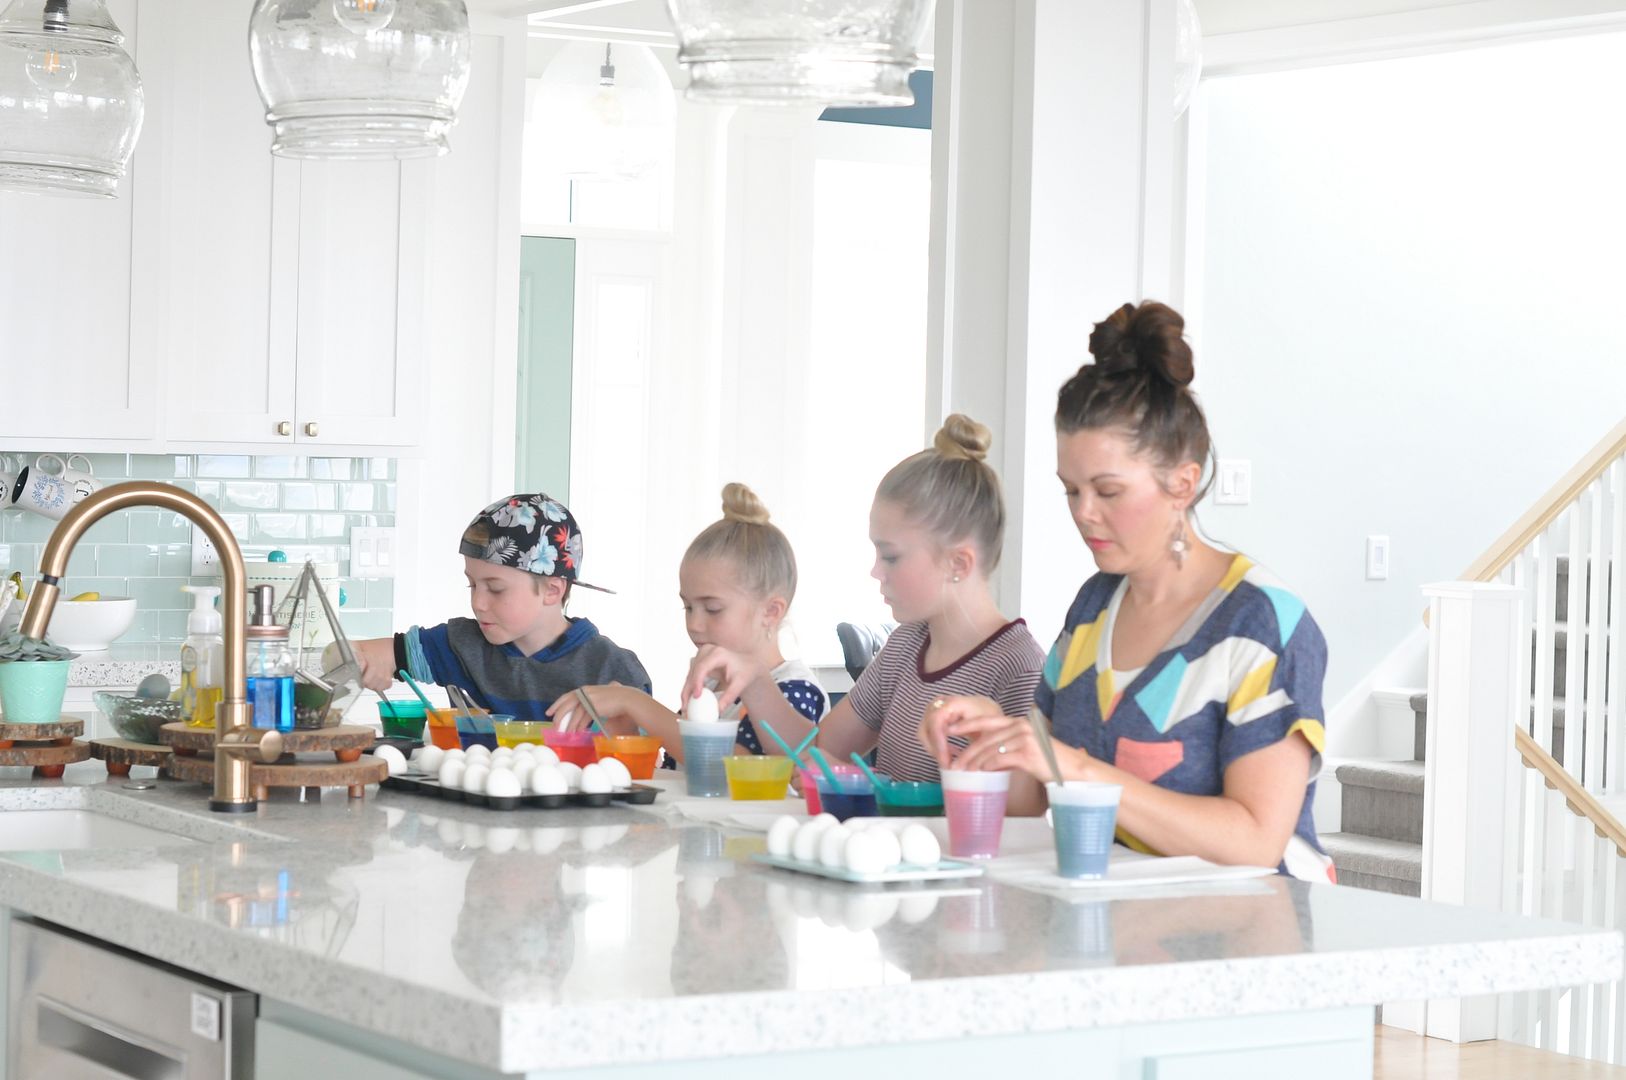
We had such a great time together.  Usually I stand back and photograph, but mostly I participated this time. Oh! and I just realized that the girls and I decided that it was a bun day today.  It is going to storm today so why do your hair? Buns for the hair it is!

 photo Egg Decorating APril 2017-1057_zpsng411p66.jpg

  Jex didn’t join us, because it is the last day of ski season.  Skiing is everything to that boy, so we let him pass this time.

I found that these mini muffin trays, hold the eggs so well.

 photo Egg Decorating APril 2017-1046_zpsbkafi7ez.jpg

I picked this one up at our local thrift store this last week.  I even spray painted it to make it look adorable, not even knowing I would use it for this purpose.  So go search out your thrift stores.  I’m going to use it for jewelry or little craft supplies when I’m done with this.

 photo Egg Decorating APril 2017-1045_zpsv9g0dmx4.jpg

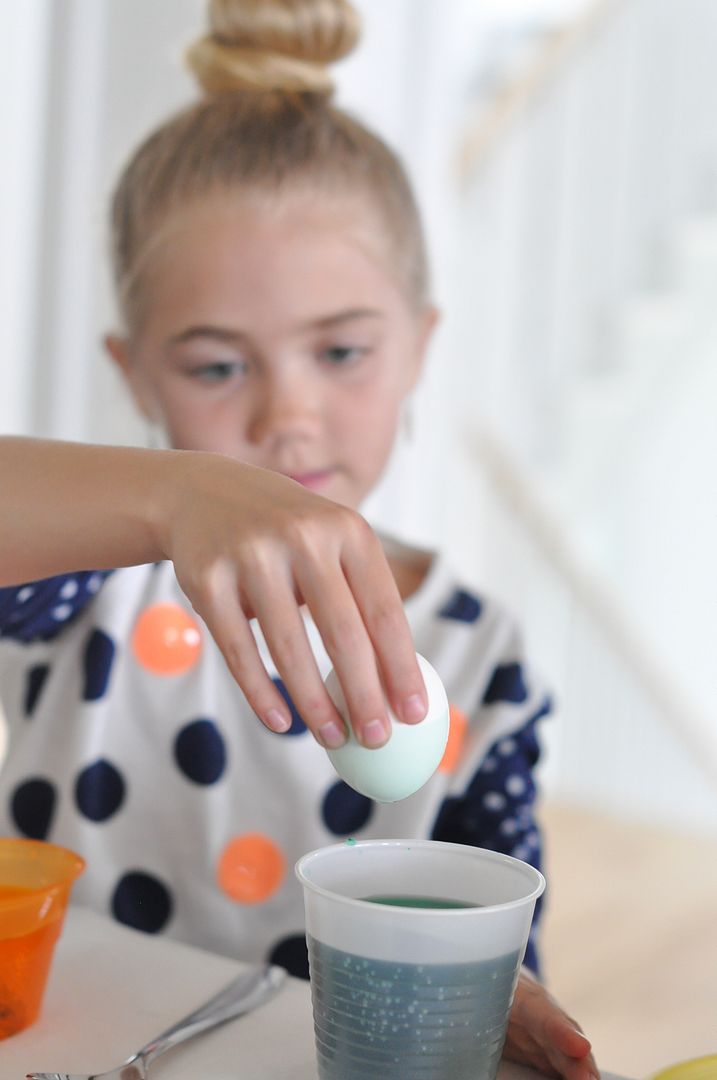
We just used the normal dyes that you buy at the grocery store for egg dying.  I made a few fun colors out of vinegar and food coloring too. I always buy two egg dying kits because none of the kids are patient enough to wait on colors.  I also never like the process to take hours.  That was a trick I learned a long time ago.  It’s worth the extra $1.50.  

We made sure to leave a few eggs white, because we had some plans for those.

 photo Egg Decorating APril 2017-1054_zpss5abtwm1.jpg

The kids and I liked trying to make some of them hombre, and dipping in two colors and seeing what happens.  We tried all sorts of fun things when it comes to the dying part.

 photo Egg Decorating APril 2017-1058_zpssirgek3r.jpg

THE GOLDEN LETTERED EGG

Ok!  One of our favorite decorating tricks was actually with spray paint.  We took a white egg, and added a sticker.  Make sure to press it down hard.

 photo Egg Decorating APril 2017-1096_zps5zw5pb1o.jpg

Then we took the egg outside and spray painted them gold.

 photo Egg Decorating APril 2017-1098_zpsoeddp0lp.jpg

Once they were dry we took the sticker off

 photo Egg Decorating APril 2017-1119_zpsxnnff3up.jpg

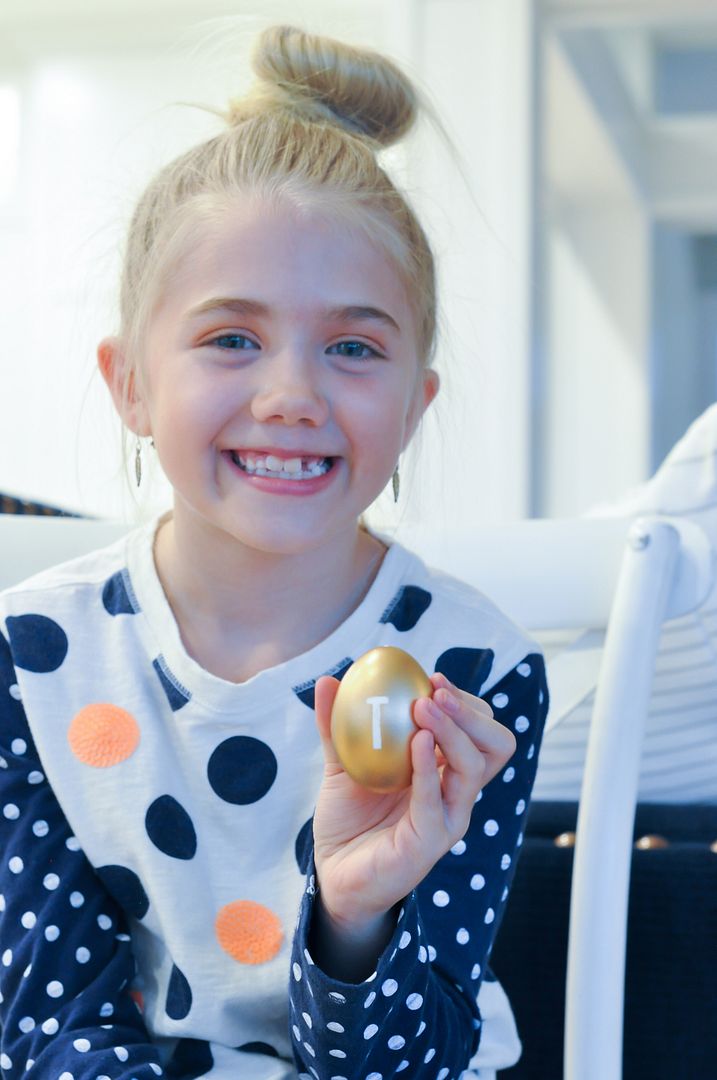
Seriously so much fun!!  These would make great place cards at the dinner table on Easter.

Level: 5 because of Spray paint

GOLD SPONGING

We did another fun one with some Gold Paint.

We did some sponge painting on the eggs.  We used gold paint and some sponge brushes.  If you don’t have sponge brushes, you could use sponges cut in strips.

 photo Egg Decorating April 2017-1122_zps2pekbjmy.jpg

They give the eggs such a fun feel. 

Level: 3 for sure.  Tess did this mostly on her own.  For sure needs a good hand washing after.

PUFF PAINT POLKA DOT EGGS

We have had a good stash of puff paint on hand for a while, so I thought why not?

The important thing to remember with this is that it takes a while to dry. 

 photo Egg Decorating APril 2017-1102_zpsxlyxfcms.jpg

So you can only do about half of the egg at a time.

 photo Egg Decorating APril 2017-1120_zpshzltclsi.jpg

We did polka dots mostly, and even wrote a few words like Stella’s IDK for I don’t know.(cause she ran out of things to say)

Notice how only half of the egg is polka dotted.  This is the kids tray.  They need to come back and finish the egg.

Level:I would say this is between a 3 and 4 for difficulty.  Tess needed some help with this, and Isaac just needed help getting started.

WASHI SHAPES AND STRIPES

Can you say WASHI?

We use it for everything at our house.  We put washi tape on everything.  We decided to put it on the eggs to.  It made them look awesome.

 photo Egg Decorating APril 2017-1100_zps5wtebdbe.jpg

Some we just put around the middle of the egg as a stripe around the middle.  I cut teeny tiny triangles, and put them all over an egg.

 photo cropped eggs 4-1107_zpsbdra0n1n.jpg

Depending on what you are doing with the washi depends on the level.

Level:1 for just a simple wrap around stripe.  Difficult shapes would be a 5.

GLITTER EGGS

Glitter is just too fun not to be added to the mix.

This was simple.  We just used a simple glue pen and added it to our egg where we wanted the glitter to be.  You can draw shapes, symbols, letters or words.

 photo Egg Decorating APril 2017-1103_zps9fczhujr.jpg

Then with the help of a big person, the glitter was added.

Tessa wrote the number 8, because she is turning 8 this year.

 photo cropped eggs 5-1120_zpswgutvahm.jpg

8 is a big year in our church.  It is the year you are baptized, and she is excited about that.

Level: 1 for using a glue pen and drawing the design, 5 for adding the glitter

NOTE: I like the Heidi Swapp glitter it can be found at Hobby Lobby or Michaels.

MARBLE EGGS

The last one the kids loved was the marble eggs.  It seemed to work best with white eggs; not dyed. I tried it on a colored egg, and it worked but not as well.

 photo cropped eggs-1120_zpsjafrsztk.jpg

It involves fingernail polish and a bowl that you don’t care to keep.

Fill the bowl with warm water, and add a few drops of finger nail polish.  Then stir with a small straw.

 photo cropped eggs 2-1120_zpsgzqsavto.jpg

Drag egg through the polish until it is completely covered.  Then just allow the polish to dry. 

 photo cropped eggs 3-1107_zpsl0agpyhj.jpg

The pink one in the center is mine with mint nail polish on it.  It didn’t work as well.  You can see though, how we have done a few of these different techniques together on one egg.  This pink egg is dyed, it’s got mint polish, and gold glitter on it.  So try doing a few together and see what happens.

These polish ones look really cool and have a great marble effect.  If you want to use another color when using the polish, just rinse out the bowl, and then pick a new polish color. Start the process over.  When you are finish, throw the bowl away.  You may want to use rubber gloves for this technique.

Level: 5 for sure!! Stella did these all by herself.  She even did mine. I just supervised.

So… here is a little taste of how mine came together:

 photo Egg Decorating APril 2017-1110_zpsnnhimuku.jpg

I do have a couple words written on mine with puff paint, but I am saving those for a later date. You will have to stay tuned to see what those say. It was fun writing on them in cursive with cursive handwriting and puff paint.  That is something to try also.

 photo Egg Decorating APril 2017-1104_zpsgtaamksm.jpg

The kids did awesome too!!

 photo Egg Decorating APril 2017-1120_zpshzltclsi.jpg

…and I had so much fun hanging out with them.

 photo Egg Decorating APril 2017-1050_zpsqikuhbzx.jpg

I love spending time with my kids being creative.

I hope this sparks a few ideas, and makes you want to dive into the egg dying process with your kids this year.  It really was so much fun. 

 photo Egg Decorating APril 2017-1070_zpsooyk59mo.jpg

I am so glad I joined in this year!!


Thursday, February 2, 2017

Delicious Chicken Curry.

It’s time to share one of my favorite recipes.

Chicken Curry

I’m sharing this because It’s cold outside, and I’ve caught a cold that has made me feel awful.  I’m at that point in the winter where I am ready for it to be over. 

This nice little recipe totally warms me up on a cold yucky day. It is full of those yummy good for you veggies, and it’s one that my kids beg for.

This is a recipe that I put together when we lived in the Caribbean.  I put it together because that’s when I discovered how much I loved curry, and I wanted to learn how to make it.

Every recipe that I read was different, so I took several recipes and took what I loved from each and put them all together.

What I love about this recipe is that it is a one pot recipe.  You can make everything except for the rice in one pot.  I hate when I have to dirty lots of pots and pans for one meal, so this one is awesome.

I love making this recipes in this pot.  It is my Pioneer Woman enameled Dutch oven.

cooking 2017-0115

Here is are the steps to this deliciousness:

What you will need:

2 T. olive oil

1 Large onion

2 cloves garlic

4 t. ginger

8 t. coriander

8 t. curry powder

2 t. cumin

1/4 t. turmeric

1/4 t. cayenne pepper

1/4 t. black pepper

3 t. salt

1 can petite diced tomatoes

3 cups water

3 t. chicken bouillon powder

8-12 chicken tenders or 4 chicken breasts

4 potatoes

1 yellow squash

A handful or two of baby carrots sliced in half

1 zucchini

1 sweet potato

3 cans coconut milk

Basmati Rice(must use basmati; this is what makes the curry taste so wonderful)

Chop onion into fine pieces, and heat oil.  Cook chopped onion until brown.  Add garlic and ginger and cook for 1 minute.  Add all the spices and cook for one minute more.  It will get really fragrant.  This will look like a lot of spices.

cooking 2017-0094

This is what makes it sooooo good.

cooking 2017-0089

I like to gather all the spices before I begin so that I’m not running around looking for them when it’s time to dump them in.

Add water, and thinly sliced potatoes, with chicken bouillon.  We like to slice the potatoes with a mandolin so they slice really thin, and cook faster. 

cooking 2017-0100

If you don’t have one, just chop them into smaller pieces.  Add the squash, zucchini, sweet potatoes, baby carrots, all the same way, and at the same time; and then add 2 cans of coconut milk to it. 

cooking 2017-0105

Cover it for about fifteen minutes and let it cook down and simmer over medium heat until the vegetables soften. 

After 15 minutes, add the chicken.  The chicken needs to be added in small pieces as well.  You can slice it, or I like to use kitchen shears and cut it in to small chunks.

cooking 2017-0109 

Cover it again, and let it stand for 15 more minutes.

Once you add the chicken, you should start preparing your rice in your rice cooker.  If you don’t have a rice cooker, you can just prepare this in a normal pot.

Add your last can of coconut milk to the pan, and add  2 more cans of water to the rice cooker or your pot.  Then add 2 cups of rice to the rice cooker, or the pan.  Hit cook on the rice cooker or follow the cooking instructions for the stovetop on the rice bag for the stovetop.

Basmati rice can be found in the grocery store by all the other rice.  It is a little bit more money, but it is so worth it. I promise!!

After fifteen minutes and your chicken is cooked, stir in the can of tomatoes; and serve over the hot rice.

Chicken Curry 

You guys will die this is so good.

It is even better the next day.  It makes great leftovers, and I really don’t even like leftovers.

Thursday, January 26, 2017

One of the prettiest girls I know…

I had sooo much fun a few weekends ago.  My darling sister asked me to shake the dust off my camera, and do a photoshoot.

 photo Kristins Maternity-0734_zpsa8kzi54f.jpg

I was so excited to take her maternity pictures.

 photo Kristins Maternity-0686_zpsvwf5vdbb.jpg

Right after she asked me, she ended up in the hospital because of her Placenta Previa.

 photo Kristins Maternity-0655bw_zpsl9dl5pqt.jpg

I rushed down there as fast as I could, and hoped she would be better and feel up to photos.  I prayed that all would be well.

 photo Kristins Maternity-06132_zpsfyx8qhbt.jpg

Luckily they got everything calmed down, put her on a mild bedrest and…

 photo Kristins Maternity-0752_zps4qgwkerm.jpg

told that baby to stay put for a while longer.

 photo Kristins Maternity-0653_zpskwt9ireu.jpg

He needs to bake a little longer.

 photo Kristins Maternity-0038_zpsxkwdvr7s.jpg

We also did some photos of the whole fam showing their love to the babe in the belly.

 photo Kristins Maternity-08652_zpsrtavpmgx.jpg

Hank was not showing his love.  He was kinda mad, but that’s a 3 year old

 photo Kristins Maternity-0911_zpswad6gcb0.jpg

He was mostly mad about his sweater.

 photo Kristins Maternity-0936LOVE_zpsnwkkarra.jpg

We finally got him to perk up at the end, after we found a dog for him to pet.

 photo Kristins Maternity-0022_zpsudvzujbh.jpg

I am so amazed at the strength and beauty of this women.

 photo Kristins Maternity-08202bw_zpssrzu0v4b.jpg

She has been thru many hard things, and always comes through smiling and teaching me how to be better.  I learn to be a better wife and mother from her.

 photo Kristins Maternity-0768_zpsqyoyfpym.jpg

I am so excited to meet this new little guy.

 photo Kristins Maternity-07962_zpsode8rhc1.jpg

I know he is a special little spirit.  He is so lucky to have Kristin as his Mom, and Jared as his Dad.

 photo Kristins Maternity-0824_zpsnrszwt8o.jpg

I am ready to hold him, but not yet!! He needs to stay put a little longer.

 photo Kristins Maternity-0040_zpsm4nbz1fs.jpg

This was a fun day.  I loved capturing this moment in time.

Thanks for letting me a part of this, I love you sis.

Related Posts with Thumbnails